---
PlayStation 3 CECHLO4 IHS removal with Delid Tool V2
After a long period of time, it is necessary to remove the IHS from the processor and graphics chip
and replace the thermal paste in that place so that the PS3 has an ideal temperature.
With Delid Tool V2 it is extremely easy to remove the cpu IHS.
This video shows how to remuve ps3 fat IHS .
Preparation: Clean the IHS surface thoroughly. Use a heat gun or hair dryer on low to heat the IHS to approximately
100∘C100 raised to the composed with power C
100∘C to soften the adhesive.
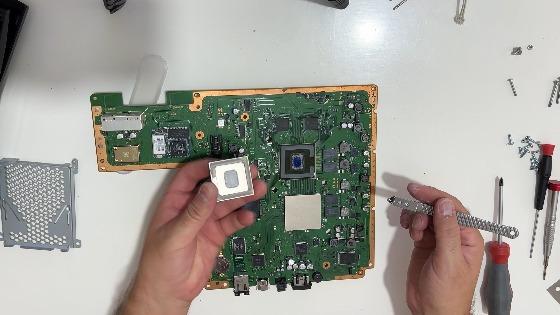
Tool Insertion: Insert the Delid Tool V2 blade between the metal IHS and the green motherboard substrate.
Cutting Sealant: Slowly, with constant pressure, push the tool around the perimeter of the chip to cut through the silicone sealant.
Handling Obstacles: Be aware of small components near the edge, especially on newer models (e.g., 2500x) that may have soldered, glue-like, or small capacitor,, obstructions.
Lift: Once the adhesive is cut on all sides, the IHS should lift off easily.
Re-paste: Clean the old paste off the die and IHS using isopropyl alcohol. Apply high-quality thermal paste (e.g., Arctic Silver 5) directly to the die and optionally to the top of the IHS before reassembly.
Critical Tips
- Safety: Always use ESD protection, as the components are extremely sensitive.
- Avoid Damage: Do not push the blade too deep into the chip, as you may sever components or damage the substrate.
- Practice: If this is your first time, practice on a dead or cheaper unit (like a Phat PS3).
Removal IHS from RSX with RSX / GPU Delid Tool Quick and Easy
This video showing step by step how to removal IHS from RSX
This video showing step by step how to open PlayStation 3 CECHLO4
Opening the Console:
Tools: TR8/TR10 Torx Security Screwdrivers, Phillips screwdriver, tweezers.
Procedure: Remove the HDD cover, pull the HDD, remove all external screws (including those under rubber feet/warranty stickers), and carefully lift the casing.
Motherboard: Unplug the power supply, Blu-ray drive, and fan, then remove the screws holding the shielding to access the motherboard.
0:00 Introduction
0:05 Unscrew the screw that holds the decorative cover
0:13 Remove the decorative cover
0:15 Unscrew the screws from the lid
0:34 Squeeze the clips holding the cover and remove it.
0:41 Disconnect the cables and unscrew the screws on the power supply
1:04 Gently remove the power supply
1:07 Disconnect the flat cable and remove the disk drive
1:11 Remove hard drive
1:18 Unscrew all the screws holding the motherboard...
1:58 Remove the shield from the motherboard and then remove the motherboard.
2:16 Clean off the old thermal paste.
2:43 THE END