
Opening PlayStation 4 Controller and upgrade Micro USB to USB-C port.
This video will show you how to open the PlayStation 4 Dualshock Controller and upgrade Micro USB to USB-C port. You can also replace the battery:
Step 1: Open the Controller Casing
1. Remove Screws: Turn the controller over and unscrew the four 6.0 mm Phillips screws from the rear shell.
2. Pry Open Seams: Insert a plastic pry tool into the seam along the side of one of the handgrips. Slide it upward toward the trigger buttons to release the internal plastic clips.
3. Separate the Halves Carefully: Gently split the front and back shells apart. Do not yank them completely apart, as a fragile white flexible flat ribbon cable connects the charging board to the main motherboard.
4. Disconnect the Ribbon: Grip the white ribbon cable near its connector on the mainboard side and pull it straight out of its socket. Set the front half of the controller (with the thumbsticks and buttons) aside.
Step 2: Remove the Old Micro-USB PCB
- JDS-001
- JDS-011
- JDS-030
- JDS-040
- JDS-055
- JDS-040-050
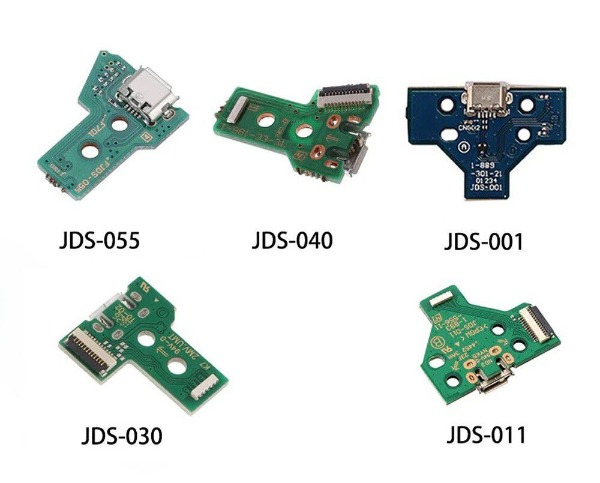
1. Access the Port: Look inside the rear shell assembly. You will see a clear plastic light diffuser pane and a black plastic mounting shield guarding the charging board.
2. Remove the Screws/Shield: Unscrew the tiny Phillips screw securing the plastic cover overlaying the PCB. Remove the cover and lift out the clear light diffuser piece.
3. Extract the Old PCB: Unscrew the single retaining screw anchoring the original micro-USB PCB to the shell housing. Lift the old green or blue PCB out of its slot.
Step 3: Modify the Casing Outer Port Window
Because a USB-C port interface housing is slightly taller and wider than a legacy Micro-USB socket shape, you must physically enlarge the controller's plastic cable entry window.
1. File the Outer Opening: Take a precision needle file or an X-Acto knife and meticulously shave down the perimeter of the existing micro-USB port opening on the rear shell.
2. Flatten Internal Ribs: Shave flat any internal plastic alignment guide pins or protruding ribs adjacent to the port window to ensure your new USB-C mod sits perfectly flush against the inner shell. I did it. with a drill and 2mm, 3mm drill bits, carefully shave the rim of the existing hole for the micro-USB port on the back shell.
3. Dry Fit Regularly: Constantly place your new USB-C mod board down into position to check the port alignment. The USB-C female collar should peek cleanly through the newly widened hole without any shell deformation or gaps.
Step 4: Install the USB-C Board Mod
1. Transfer Shielding/Tape: If your original micro-USB board features a tiny piece of black adhesive backing or tape (meant to isolate internal light bleed), peel it off and stick it onto your upgraded USB-C board.
2. Seat the Board: Push the new USB-C board securely down into the molded alignment slot within the plastic rear shell.
3. Fasten Securely: Fasten the mod board down using the original retaining screw. Replace the clear light diffuser plastic layer and the black mounting cover back over top, securing it with its dedicated screws.
4. Connect the Ribbon: Take your flex ribbon cable and open the tiny dark latch on the mod board's FPC ribbon bracket (if equipped). Slide the ribbon cable firmly into the socket slot (ensuring the blue reinforcement strip faces up/correctly aligned) and click the bracket tab shut.
Step 5: Reassemble and Test
1. Re-link Halves: Bring the two primary controller shells together. Carefully guide the remaining open end of the white ribbon cable back into the socket located on the front motherboard.
2. Snap and Secure: Align the trigger configurations (L2/R2) neatly and squeeze the upper and lower shells completely closed until all internal clips click smoothly. Reinstall the 4 external casing screws back into the handle grips.
3. Verification: Connect your upgraded DualShock 4 to a standard USB-C charger. The top light bar should begin pulsing a steady amber glow, verifying successful power delivery.
---