To open an HP Notebook 15s (fqxxx series) and replace the thermal paste, remove the rubber feet to find hidden screws, remove all base screws, and carefully pry open the casing. Disconnect the battery, remove the fan and heatsink assembly, clean the old paste with isopropyl alcohol, and apply new high-quality thermal paste.
This video shows how to open and clean the HP 15s-fq series:
Steps for HP 15s-fq Series Thermal Paste Replacement
Preparation: Shut down the laptop, unplug the charger, and remove the battery.
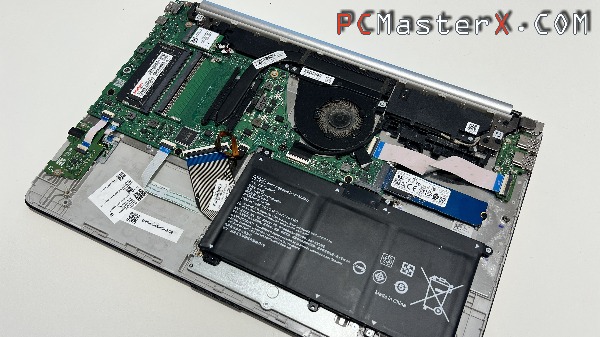
Disassembly: Remove the two rubber feet strips on the bottom to access all screws, then remove the screws to take off the base cover.
Heatsink Removal: Unplug the fan cable, unscrew the fan, and remove the screws securing the heatsink over the CPU.
Cleaning: Clean the old, dry thermal paste off both the CPU and the heatsink using isopropyl alcohol and a lint-free cloth or cotton swab.
Application: Apply a small pea-sized amount of new thermal paste directly onto the center of the CPU.
Reassembly: Reinstall the heatsink, tighten the screws in a diagonal pattern to ensure even pressure, reconnect the fan, and replace the base cover. Important Tips
Overheating Check: Only replace the paste if you are experiencing high temperatures, as it is not necessary for normal operation.
Compatible Paste: Use high-quality thermal paste to maximize heat reduction.
Cleaning Blades: Take this opportunity to clean dust from the fan blades and vents.
In the video you can also see how you can also change the following components such as: RAM, SSD, battery and of course wireless card.
List of Laptop models that have the same motherboard but differ in processor: 15s-fq1000 15s-fq5304nz 15s-fq5185tu 15s-fq1705nz 15s-fq5209TU 15s-fq1005ua 15s-fq1515na 15-d5000 and other models using the chassis 15s-fq1xxx ...
Motherboard markings:
- DA0P5NMB8E0 REV: E
- DA0P5DMB8C0 REV: C
- DA0P5HMB8E0 REV: E
- DA00P5MB6D0
- DA0P5HMB8F1
- DA0P5HMB8J0
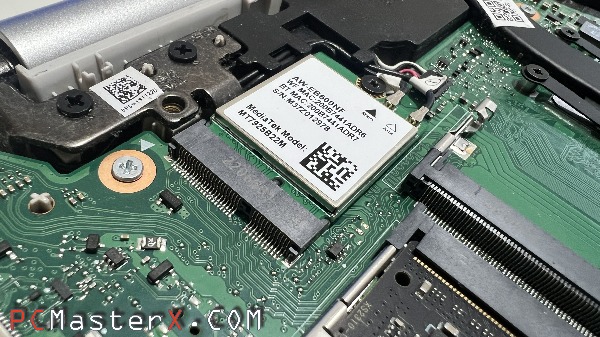
Wireless: If you are wondering whether your laptop will support a wireless card, I have prepared a list of cards that I have tried, that is, tested. Intel BE200NGW is by far the best because it supports 6GHz at 320Hz channel width, while MediaTek MT7925B22M works at 6GHz but at 160Hz channel width. Both models support the Wi-Fi 7 .
I have tested the following WiFi 7 and 6 cards that work on this laptop.
- Intel BE200NGW
- MediaTek MT7925B22M
- Realtek RTL8852BE (PCIE+USB3)
- MediaTek MT7921 AW-XB468NF REVOA
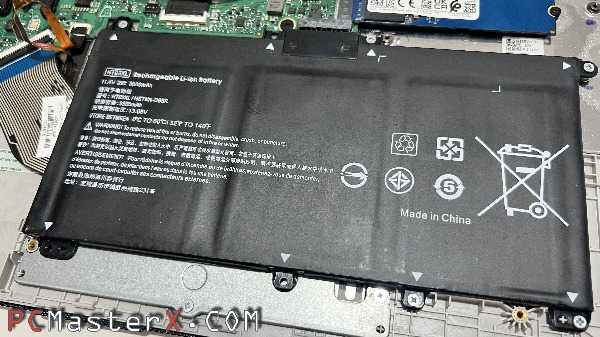
Battery:
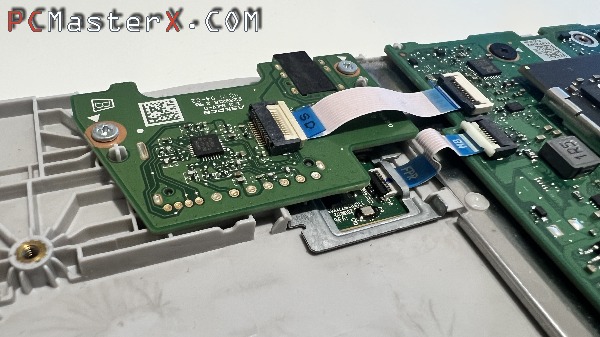
Model that has a fingerprint scanner:
Specification
CPU Intel Core i5-1035G1 (15s-fq1705nz)
CPU Intel Core i3-1215U (15s-fq5304nz)
Chipset Intel Integrated SoC
Memory 16 GB DDR4-2666 - 3200 SDRAM
VGA Intel UHD Graphics - Mesa Intel Graphics (ADL GT2)
SSD PCIe NVMe™ M.2 SSD
Display 39.6 cm (15.6") diagonal FHD IPS anti-glare micro-edge WLED-backlit (1920 x 1080)
Wireless Intel Wi-Fi 6 AX 201 (2x2) and Bluetooth® 5 Combo
It works extremely well under linux ubuntu 22.04.2
- 0:00 Introduction
- 0:15 Remove the rubber feet foot strips
- 0:27 Unscrewing the screw on the cover
- 0:40 Open the cover
- 1:00 Removing ssd
- 1:02 Unscrew the battery screws and remove the battery.
- 1:12 Disconnect the flat cable.
- 1:13 Unscrew the screws.
- 1:20 Disconnect the fan cable and remove the fan.
- 1:28 Unscrew the screw cooler and clean it
- 1:37 Remove or upgrade Ram SODIM DDR4
- 1:40 Clean off the old thermal paste
- 1:52 Apply new thermal paste
- 2:03 Screwing of the cooler
- 2:22 Install the fan and secure it with a screw.
- 2:39 Place the ssd and tighten the screw on the ssd
- 2:44 Insert and screw the battery in
- 3:01 Put the lid on.
- 3:17 Screw the screws on the lid.
- 3:35 Install the rubber feet foot strips
- 3:44 THE END