Install Mail Server with Postfix Dovecot PostfixAdmin MySQL Apache2 UFW
on Ubuntu Servers 22.10 20.04.5 18.04.6 16.04.7
![]()

![]()

Step 1
The first thing you should do if you haven't
apt-get update -y
apt-get upgrade -y
Step 2
It is necessary to create a location to receive messages from users ... and give them privileges ...
useradd -r -u 150 -g mail -d /var/vmail -s /sbin/nologin -c "Virtual Mail User" vmail
mkdir -p /var/vmail
chmod -R 770 /var/vmail
chown -R vmail:mail /var/vmail
Step 3

Install MySQL Server
sudo apt install mysql-server
login in MySQL Server and create users ...
sudo mysql
ALTER USER 'root'@'localhost' IDENTIFIED WITH mysql_native_password BY 'YOUpassword';
You need to create a user and database for postfis admin web ...
CREATE DATABASE dbpostfixadmin;
CREATE USER 'userpostfixadmin'@'localhost' IDENTIFIED BY 'YOUpassword';
GRANT ALL PRIVILEGES ON dbpostfix. * TO 'userpostfixadmin'@'localhost';
Additional comments
sudo service mysql status
sudo mysql_secure_installation (on ubuntu 16.04)
mysql -u root -p (login with password)
sudo mysql (frst login one paswword)
Step 4
![]()
Installation of postfis with necessary packages ...
sudo apt-get install postfix postfix-mysqlPorts need to be opened 25 465 and 587 . The following file needs to be bodified... master.cf
sudo nano /etc/postfix/master.cfThe modified file should look like...
# ==========================================================================
# service type  private unpriv  chroot  wakeup  maxproc command + args
#               (yes)   (yes)   (no)    (never) (100)
# ==========================================================================
smtp      inet  n       -       y       -       -       smtpd
#smtp      inet  n       -       y       -       1       postscreen
#smtpd     pass  -       -       y       -       -       smtpd
#dnsblog   unix  -       -       y       -       0       dnsblog
#tlsproxy  unix  -       -       y       -       0       tlsproxy
# Choose one: enable submission for loopback clients only, or for any client.
#127.0.0.1:submission inet n -   y       -       -       smtpd
submission inet n       -       y       -       -       smtpd
  -o syslog_name=postfix/submission
  -o smtpd_tls_security_level=may
  -o smtpd_sasl_auth_enable=yes
#  -o smtpd_tls_auth_only=yes
#  -o smtpd_reject_unlisted_recipient=no
#  -o smtpd_client_restrictions=$mua_client_restrictions
#  -o smtpd_helo_restrictions=$mua_helo_restrictions
#  -o smtpd_sender_restrictions=$mua_sender_restrictions
#  -o smtpd_recipient_restrictions=
#  -o smtpd_relay_restrictions=permit_sasl_authenticated,reject
#  -o milter_macro_daemon_name=ORIGINATING
# Choose one: enable smtps for loopback clients only, or for any client.
#127.0.0.1:smtps inet n  -       y       -       -       smtpd
smtps     inet  n       -       y       -       -       smtpd
  -o syslog_name=postfix/smtps
  -o smtpd_tls_wrappermode=yes
  -o smtpd_sasl_auth_enable=yes
#  -o smtpd_reject_unlisted_recipient=no
#  -o smtpd_client_restrictions=$mua_client_restrictions
#  -o smtpd_helo_restrictions=$mua_helo_restrictions
#  -o smtpd_sender_restrictions=$mua_sender_restrictions
#  -o smtpd_recipient_restrictions=
#  -o smtpd_relay_restrictions=permit_sasl_authenticated,reject
#  -o milter_macro_daemon_name=ORIGINATING
#628       inet  n       -       y       -       -       qmqpd
It is necessary to check that the ports are open 25 465 587
The port checker should look like...
sudo apt install net-tools
netstat -tnl

Step 5
It is necessary to create a directory for communication with the MySQL base ...
mkdir -p /etc/postfix/dbsql/It is also necessary to create files inside the created directory ...
sudo nano /etc/postfix/dbsql/mysql_virtual_alias_domain_catchall_maps.cf

user = userpostfixadmin
password = YOUpassword
hosts = localhost
dbname = dbpostfixadminm
query = SELECT goto FROM alias,alias_domain WHERE alias_domain.alias_domain = '%d' and alias.address = CONCAT('@', alias_domain.target_domain) AND alias.active = 1 AND alias_domain.active='1'

-------------

sudo nano /etc/postfix/dbsql/mysql_virtual_alias_domain_mailbox_maps.cf

user = userpostfixadmin
password = YOUpassword
hosts = localhost
dbname = dbpostfixadmin
query = SELECT maildir FROM mailbox,alias_domain WHERE alias_domain.alias_domain = '%d' and mailbox.username = CONCAT('%u', '@', alias_domain.target_domain) AND mailbox.active = 1 AND alias_domain.active='1'

--------------

sudo nano /etc/postfix/dbsql/mysql_virtual_alias_domain_maps.cf

user = userpostfixadmin
password = YOUpassword
hosts = localhost
dbname = dbpostfixadmin
query = SELECT goto FROM alias,alias_domain WHERE alias_domain.alias_domain = '%d' and alias.address = CONCAT('%u', '@', alias_domain.target_domain) AND alias.active = 1 AND alias_domain.active='1'

--------------

sudo nano /etc/postfix/dbsql/mysql_virtual_alias_maps.cf

user = userpostfixadmin
password = YOUpassword
hosts = localhost
dbname = dbpostfixadmin
query = SELECT goto FROM alias WHERE address='%s' AND active = '1'

--------------

sudo nano /etc/postfix/dbsql/mysql_virtual_domains_maps.cf

user = userpostfixadmin
password = YOUpassword
hosts = localhost
dbname = dbpostfixadmin
query = SELECT domain FROM domain WHERE domain='%s' AND active = '1'

---------------

sudo nano /etc/postfix/dbsql/mysql_virtual_mailbox_limit_maps.cf

user = userpostfixadmin
password = YOUpassword
hosts = localhost
dbname = dbpostfixadmin
query = SELECT quota FROM mailbox WHERE username='%s' AND active = '1'

--------------

sudo nano /etc/postfix/dbsql/mysql_virtual_mailbox_maps.cf

user = userpostfixadmin
password = YOUpassword
hosts = localhost
dbname = dbpostfixadmin
query = SELECT maildir FROM mailbox WHERE username='%s' AND active = '1'
Step 6
Create an SSL certificate
sudo openssl req -x509 -nodes -newkey rsa:2048 -keyout mailserver.key -out mailserver.crt -nodes -days 365

sudo openssl req -new -x509 -extensions v3_ca -keyout cakey.pem -out cacert.pem -days 3650
Then move the files into this folder:
sudo mv mailserver.key /etc/ssl/certs/
sudo mv mailserver.crt /etc/ssl/private/
sudo mv cakey.pem /etc/ssl/certs/
sudo mv cacert.pem /etc/ssl/private/
or Instal certificate on Ubuntu server 22.04 Secure Apache with Let's Encrypt
Step 7
File modification main.cf Need to add commands ... To connect mysql and postfix also to connect dovechot and postfix ...
# TLS parameters
smtpd_tls_cert_file=/etc/ssl/certs/mailserver.crt
smtpd_tls_key_file=/etc/ssl/private/mailserver.key
# smtp ssl with dovecot
smtpd_sasl_auth_enable = yes
smtpd_sasl_type = dovecot
smtpd_sasl_path = private/auth

# mysql postfix admin
virtual_mailbox_domains =
       proxy:mysql:/etc/postfix/dbsql/mysql_virtual_domains_maps.cf
virtual_alias_maps =
       proxy:mysql:/etc/postfix/dbsql/mysql_virtual_alias_maps.cf,
       proxy:mysql:/etc/postfix/dbsql/mysql_virtual_alias_domain_maps.cf,
       proxy:mysql:/etc/postfix/dbsql/mysql_virtual_alias_domain_catchall_maps.cf
virtual_mailbox_maps =
       proxy:mysql:/etc/postfix/dbsql/mysql_virtual_mailbox_maps.cf,
       proxy:mysql:/etc/postfix/dbsql/mysql_virtual_alias_domain_mailbox_maps.cf

# Otern
myhostname = mail.youdomain.com
mydestination = localhost
virtual_transport = lmtp:unix:private/dovecot-lmtp
message_size_limit = 102400000
inet_protocols = ipv4
mynetworks = 127.0.0.0/8 192.168.0.0/24

smtpd_recipient_restrictions =
       permit_sasl_authenticated,
       permit_mynetworks,
       reject_unauth_destination
Commands to run ...
sudo systemctl enable postfix
sudo systemctl restart postfix
sudo systemctl status postfix
Step 8
Install Dovecot ...
sudo apt-get install dovecot-core dovecot-lmtpd dovecot-imapd dovecot-pop3d dovecot-mysqlEdit
sudo nano /etc/dovecot/dovecot-sql.conf.extAdd the following lines
driver = mysql
connect = host=localhost dbname=dbpostfixadmin user=userpostfixadmin password=YOUpassword
default_pass_scheme = MD5-CRYPT
password_query = SELECT username as user, password, '/var/vmail/%d/%n' as userdb_home, 'maildir:/var/vmail/%d/%n' as userdb_mail, 150 as userdb_uid, 8 as userdb_gid FROM mailbox WHERE username = '%u' AND active = '1'
user_query = SELECT '/var/vmail/%d/%u' as home, 'maildir:/var/vmail/%d/%u' as mail, 150 AS uid, 8 AS gid, concat('dirsize:storage=', quota) AS quota FROM mailbox WHERE username = '%u' AND active = '1'
Edit
sudo nano /etc/dovecot/conf.d/10-mail.confAdd
mail_location = maildir:/var/vmail/%d/%n
mail_privileged_group = mail
mail_uid = vmail
mail_gid = mail
first_valid_uid = 150
last_valid_uid = 150
Edit:
sudo nano /etc/dovecot/conf.d/10-ssl.confAdd
ssl = yes
ssl_cert = </etc/ssl/certs/mailserver.crt
ssl_key = </etc/ssl/private/mailserver.key
Edit:
sudo nano /etc/dovecot/conf.d/15-lda.confAdd
postmaster_address = This email address is being protected from spambots. You need JavaScript enabled to view it. Edit
sudo nano /etc/dovecot/conf.d/10-master.confAdd
service lmtp {
     unix_listener /var/spool/postfix/private/dovecot-lmtp {
     mode = 0600
     user = postfix
     group = postfix
     }
}


service auth {
     unix_listener /var/spool/postfix/private/auth {
     mode = 0666
     user = postfix
     group = postfix
}

unix_listener auth-userdb {
     mode = 0600
     user = vmail

}
user = dovecot
}

service auth-worker {
user = vmail
}
Edit
Sudo nano/etc/dovecot/conf.d/10-auth.confAdd
auth_mechanisms = plain login
#!include auth-system.conf.ext
!include auth-sql.conf.ext
Command run ...
chown -R vmail:dovecot /etc/dovecot
chmod -R o-rwx /etc/dovecot
And
sudo systemctl enable dovecot
sudo systemctl restart dovecot
sudo systemctl status dovecot
Check if the ports are open 110 143 993 995
netstat -tnl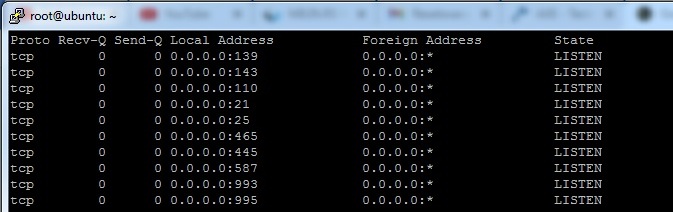
Step 9
Install Apache2 web server ...
sudo apt update
sudo apt install apache2
Edit file
sudo nano /etc/apache2/apache2.confAdd
ServerName 127.0.0.1

<Directory /var/www/>
    Options Indexes FollowSymLinks
    AllowOverride All
    Require all granted
</Directory>
Command
sudo systemctl restart apache2
sudo systemctl status apache2
Step 10
![]()
Install PHP
sudo apt install phpChek version
php -vInstall PHP Extensions
sudo apt install php-common php-mysql php-xml php-xmlrpc php-curl php-gd php-imagick php-cli php-dev php-imap php-mbstring php-opcache php-soap php-zip php-redis php-intl -yStep 11

UFW Enable and add ruls ...
sudo ufw allow OpenSSH
sudo ufw allow in "Apache Full"
sudo ufw allow 25
sudo ufw allow 465
sudo ufw allow 587
sudo ufw allow 110
sudo ufw allow 143
sudo ufw allow 993
sudo ufw allow 995
sudo ufw enable
sudo ufw restart
sudo ufw status
Step 12
![]()
![]()
Install PostfixAdmin
Creating directories and granting privileges ...
sudo mkdir -p /var/www/postfix/public_html
sudo chmod -R 755 /var/www/postfix/public_html
sudo chown -R www-data:www-data /var/www/postfix/public_html
Dovnload Postfix Admin
sudo apt install wget
wget https://github.com/postfixadmin/postfixadmin/archive/postfixadmin-3.3.11.tar.gz
Extrakt
sudo mv /var/www/postfixadmin-postfixadmin-3.3.11 /var/www/postfix/public_htmlSetting Up Permissions
sudo mkdir -p /var/www/postfix/public_html/templates_c
sudo chmod -R 777 /var/www/postfix/public_html/templates_c
Create Apache Virtual Host for PostfixAdmin
sudo nano /etc/apache2/sites-available/postfix.confAdd
# Postfix

Alias /postfix "/var/www/postfix/public_html/public/"
<Directory "/var/www/postfix/public_html/public/">
        Options FollowSymLinks
        AllowOverride None
        Allow from all
        Order allow,deny
</Directory>
Run
sudo a2ensite postfix.conf
sudo systemctl restart apache2
Configure PostfixAdmin edit file config.inc.php
sudo nano /var/www/postfix/public_html/config.inc.phpAdd
$CONF['configured'] = true;
$CONF['database_type'] = 'mysqli';
$CONF['database_host'] = 'localhost';
$CONF['database_user'] = 'userpostfixadmin';
$CONF['database_password'] = 'YOUpassword';
$CONF['database_name'] = 'dbpostfixadmin';
$CONF['encrypt'] = 'md5crypt';
$CONF['admin_email'] = This email address is being protected from spambots. You need JavaScript enabled to view it. ';Run web interfaces setup ...
Edit the config.local.php file and add the generated hash to it
$CONF['setup_password'] = 'jkhsdfgbafcv73468ot7vtbrzavuz7or4984z';And create admin user ...
Based on my experiences, I wrote this article, I hope it will be useful in the future, I will refine it, that is, improve it for myself, this is the basis for the mail server ...